The Resolution Solution
A Photo-Tip by Tom Nolle
For many, particularly those who grew up with film photography, digital photography is a daunting new world. To make matters worse, one of the most confusing elements is also one of the most fundamental; the idea of resolution. Since resolution is fundamental to digital photography and to image processing as well, it’s at the core of many of the other issues we’re going to be covering in our digital tips, so we’re going to deal with the resolution issue right here and now.
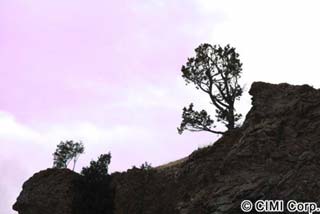 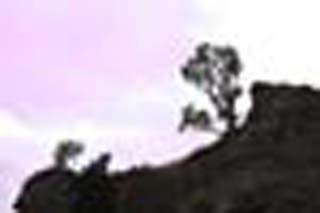
Let’s start by looking at two pictures, or really only one, above. These two images are both the same size and were created from the same digital source in the same package. So why is one clear and the other looking like it’s taken through a dirty lens? The answer is resolution, but it’s not the resolution of these images per se. Both have the same 72 dpi resolution, in fact. The devil is in the details, as we’ll see.
When a digital image is created (via a digital camera from a live scene, or via a scanner from film, transparency, or negative), the “real-world” image or picture is converted to a digital format that a computer can manage. The process involves dividing the image into small pieces (pixels) and then converting each piece to a set of digital values that represents the intensity of the light and its color in that particular place. This is sometimes called “digitizing” an image.
Resolution is the term that’s used to define how many pixels are involved in this process. Think of each pixel as a little piece of a puzzle. The image is “projected” onto this “sheet of pixels”, and each pixel is then converted to the digital value of its colors and light intensity, using the average of the piece of the image that’s found there. Think of each pixel as a little square. Whatever part of the image that’s contained in that little square is represented as a single color at a single level of light intensity. In short, the detail within the pixel is lost.
How much detail is lost? It depends on how many pixels there are. Pixel density is usually measured in one of three ways; pixels or dots per inch (dpi), the total pixel dimensions for the image, or the total number of pixels in the image. Each of these measurement strategies has its own applications. When you want to print an image or scan something using a flatbed scanner, dots per inch is an important measure. When you’re looking at an image on the computer or the web, it’s the pixel dimensions that matter (so many wide by so many high). When you’re looking at digital cameras, it’s the total pixel count in the image you care about. This latter measurement is usually expressed as some number of megapixels, meaning millions of pixels. To tie the three together, imagine a digital image created by scanning a typical photo print six inches wide and four high. If we scanned at 300 dots per inch, we’d get an image 1800 dots wide and 1200 high. Pixel dimensions are the product of the pixels per inch and the image dimension scanned. The last of our numbers, the total pixels, is the product of the pixels in width and the pixels in height, which is 1800 x 1200 or 2.16 million pixels or megapixels. That’s about the resolution of a typical low-end digital camera.
The total number of pixels used to capture an image can be called the capture resolution. Again, it can be expressed as a total number of megapixels, but it’s best to think of it as a horizontal and vertical value. Remember that, because it’s important when we start talking about digitally manipulating images later on!
Taking digital pictures and scanning photos isn’t just fun in itself, it’s a means to an end. Digital images end up as web pictures or printed pictures in most cases, and it’s turning them into these two media that usually causes all the resolution confusion. So let’s start with basics, with a brief primer on each of the two output types.
Prints
Making prints from digital pictures can be as simple as opening the file in the image editor you use and selecting “Print”, but it’s not usually going to be that easy. The problem is that printing goes back from the world of digital pixels to the real physical world, and the transformation requires you to manage some parameters along the way.
To start off, let me say that the quality of a digital print will depend on a number of things, but foremost will be the print resolution you select. When you print, you’ll be packing those little pixels into each inch of paper, and how many you put in per inch will control how much the result looks like a real picture and how much it looks like a series of little colored blocks (called “pixilated”). Every printer manufacturer will have a recommended print resolution in dots per inch (dpi), and you’ll want to find out just what your printer vendor recommends. Don’t assume that because you bought some grand neat 1400-dpi printer, the best input will be 1400 dpi. First (for reasons we’ll get to), it’s almost impossible that you’ll be able to produce that high a print resolution from your image. Second, those “dots” they’re talking about aren’t always pixels; they may be ink dots. Most printers will produce optimum output between about 200 and 600 dpi. When in doubt, assume 300 dpi.
OK, once you know the print resolution you’ll be targeting, you’ll want to use that and the size of the print to determine what your image resolution should be for quality printing. Multiply the print resolution in dpi by the dimensions of the print in inches, and you’ll get the pixel size of your print image. If we assumed a 6x4 print (landscape) and 300 dpi printer requirements, we’d get 1800x1200 pixels. Whatever you get when you do the calculations for your print and printer, that will be the optimum image size to print.
For the next step, compare this image size to the size of the image you’ve captured. There are three possibilities; the print image size is the same as the capture image size, the print image needs to be larger, or it needs to be smaller. Let’s take these one at a time.
If the print image size is roughly the same as the capture image size, you’ll follow these steps:
1. Uncheck the “resample image” box in the Image Size window of Photoshop and enter the optimum print resolution in the “resolution” box as pixels per inch.
2. Check the size of the image that results (the dimensions in inches). If the result is about the size of the print you want, then you’re ready to print. If it isn’t, you’ve made a mistake somewhere.
If the print image size is smaller than the capture image size, you’ll follow these steps:
1. Uncheck the “resample image” box as above, and enter your optimum print resolution. You’ll get physical dimensions for the image that are bigger than the print you want.
2. Check the “resample image” box now, be sure “constrain proportions” is also checked, and enter the desired print dimension ininches. You’ll now be ready to print.
If the print image size is bigger than the capture image size, you’ve got a special problem. Remember how pixels have a single color/lightness value that’s the average of all the stuff that’s scanned into them? Well, when you try to make a print that requires more pixels than the original image contained, you’re inventing pixels through a process called “interpolation”. Maybe this inventing process will produce pixels that are at least logical, but it can’t invent the detail that was lost because too much stuff got crammed into each pixel in the scanning process. In short, you should have used a digital camera with a higher megapixel rating, or scanned at more dpi, to get the original image. Or you should print at a smaller size. Or you will have to make some quality accommodations.
To make the best of a bad situation, you’ll have to “up-sample” the image to a larger size. That can be done in one step in Photoshop:
1. Check the “resample image” and “constrain proportions” box and enter the optimum print resolution in the “resolution” box. Photoshop will up-sample using its own internal algorithm.
The problem is that Photoshop’s internal up-sampling isn’t optimum. There are a number of tools from third parties that are supposed to do a better job (and generally do). One is Fred Miranda’s Step Interpolation action, available from his website (www.fredmiranda.com). A second is “Genuine Fractals”, available from Altamira Group (www.altamira-group.com). Use these and follow the directions for better up-sampling.
Now let’s use what we’ve learned to examine the two pictures at the top of this page. The first was downsampled to 600 horizontal dots and converted to JPEG in the way that you’d normally prepare something for web processing. The second was first made into a thumbnail image and then interpolated or “up-sampled” to get that same 600 pixels. In the process of creating the thumbnail, the downsampling lost a bunch of pixels. Those pixels had to be “invented” when the thumbnail was restored to original size. They weren’t suppressed or hiding, folks, they were GONE. They’re still gone in the upsampled image, as you can see. For this kind of upsampling, none of the interpolation methods in Photoshop, from Altamira, or from Fred Miranda, are going to help.
For those who want to be on the leading edge, there’s a very new and very off-the-beaten-path product called SAR that’s the product of a PhD’s image processing innovation. This product lets you select from a variety of algorithms for pixel-expanding, including some that are designed to preserve edge detail—something that’s easily lost in interpolation. Loss of edge detail is the primary culprit in that fuzzy look that large prints sometimes get. The product is shareware, and is available at http://www.general-cathexis.com/. We’ve just begun working with this one, and we’ll provide you a report later on just how well it does, but initial tests show that it maintains edge detail even in very large enlargements.
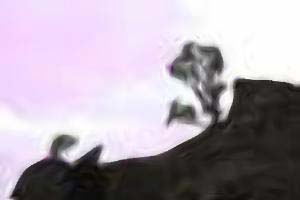
The image above is the same thumbnail expanded with the General Cathexis program. You can see that the program has made a valiant effort to recreate edge detail, and the result is certainly better than that of Photoshop, but this is still kind of funky art and not photography. So remember, there are no good strategies for inventing pixels to expand resolution for large prints, there are just some that aren’t as bad as others. Don’t expect to get good big prints except from good, high-resolution, captures.
OK, two final things. First, what do you do if the print dimensions you want don’t match the proportion of the image? Answer, crop the image using Photoshop, once it’s set up for printing, to the correct dimensions. Second, what if you really hate all this complexity in print size and resolution? Answer One; use Photoshop’s Create Picture Package automation and hope for the best. Answer Two, get a package like QImage Pro from DDI Software (www.ddisoftware.com/qimage/) and just let it do the work for you. Qimage employs Lanczos interpolation, which is fine for making typical-size prints.
Compression and Resolution: Saving Images
When you store your images on disk, they’re written in one of the many image file formats in use today. I’m not going to even attempt to cover them all, so if you have some off-the-wall storage format don’t bother reading this!
Image storage options can be divided easily using two criteria; proprietary or standard and lossy or lossless.
Proprietary file formats are the rule with image editors, like Photoshop. If you have a standard tool that you use for all your image work, it probably makes sense to save your work in the proprietary image format of that tool. If you regularly use multiple image tools or if you expect to pass images back and forth with others on a regular basis, it may be better to use one of the standard forms. But remember this; even the most successful photojournalists or photographers will use only a fraction of the shots they take in publications or for sale, so don’t use a standard format just because you may sell the picture. If you do, you can convert to one. Most image editors will work best with, and provide more features in, their own standard image format.
The lossy-versus-lossless debate is more complicated. Remember that images are captured as a series of pixels. In a lossless storage scheme, these pixels are stored so that each one can be accurately recovered when the file is read again. That means either that each pixel is written to the file intact, or that a form of compression that doesn’t lose data is employed. If you’ve ever used a program like WinZip, you know that there are compression tools that don’t affect the data. Those tools are called “lossless”…because they don’t lose anything! The problem with lossless compression is that it often doesn’t compress much. For more industrial grade compression, a “lossy” system is used. These systems (including the most popular, the Joint Photographers Expert Group, or JPEG) are going to give you back something that’s a little less than what you started. How much less depends on how much you try to compress.
The most popular lossy format is JPEG, as I’ve said. Most consumer digital cameras will produce JPEG files exclusively, and the primary thing you need to remember about this format or any lossy format is that you don’t want to keep compressing and uncompressing images because quality problems will accumulate over time. Read JPEG images into your editor and if you want to save them, do so in a lossless format. If you need to produce a JPEG again for something like Internet viewing, you can save the image as a JPEG again. Just don’t edit and resave JPEGs a bunch of time.
The most popular lossless format is the TIFF format, which can be used in either compressed or uncompressed form; it’s lossless in either case. This format and most popular proprietary formats can be saved, reloaded, edited, and resaved with no quality loss. All lossless formats are equivalent in their ability to be re-edited, so you don’t have to worry about quality problems with any of them. Also, any such format can be converted to any other one of lossless types without loss, with the proviso that you keep the resolution setting and bit depth the same.
Resolution setting we’ve talked about; it’s the total number of pixels in each dimension. Bit depth is something I’ll mention now only in passing. With high-quality scanners and cameras you can produce either 8-bit or 16-bit color. All that means is that the number of bits used to represent a color (red, green, or blue in the RGB model, for example) can be 8 (which gives up to 256 values) or 16 (which provides up to 65,536 values). Obviously you can represent more subtle color changes in 16-bit color, but if you want to use it you must capture in 16-bit mode and do all your editing and saving forever in that mode. You cannot convert between 16-bit and 8-bit and then back, because the extra values are lost in the initial conversion and can’t be recovered.
Web
Internet output is nearly always created using JPEG files (.jpg), and these have a standard resolution of 72 dpi. JPG employs “lossy compression”, meaning that some image quality is lost in theprocess. It’s for that reason that you generally don’t want to keep files in JPG format, editing and resaving them.
Web images display at a size based on the number of pixels in the image versus the number of pixels per inch on the monitor/display adapter. For JPGs, therefore, you can forget the resolution and the so-called physical dimensions of the image (because how big they’ll appear depends on the monitor), and concentrate on the pixel dimensions again.
Most web pictures will be no more than 500 to 800 pixels in any dimension, because something larger might not fit some monitors or windows. If your original image is larger (which it probably is), you’ll want to first resize it to the proper size and then compress it to create a JPG file. Resizing the image in Photoshop is simply a matter of opening the Image Size box and setting either the vertical or horizontal pixel size of the image to the number you want. When the image is resized, you can save it as a .jpg file. You absolutely positively do not want to try to compress digitally scanned images at full resolution for use on the Internet; the file sizes will be enormous, and there is no value to posting much more than about 1000 pixels in any dimension because most users won’t have a monitor and video card to display the result to full advantage.
When you save a JPG image, there’s a quality setting that determines how much the image will be compressed. If you want to display a photo on the Internet and have people appreciate how it looks, as opposed to wondering what it’s a photo of, be sure to keep the quality level up in the 7 or 8 range. If it gets much lower than about 5 you’ll start to see fuzziness.
File size in bytes is important if you expect people to download your pictures on a dial-up connection. As a rule of thumb, keep file sizes below 50k bytes.
Cropping to Size
If you have an image that has extraneous detail at one or more edges, or if the image’s aspect ratio (the relationship between height and width) doesn’t match up to that of a standard print size (like 5x7 or 8x10), you’ll have to crop the image. To do that:
1. Prepare the image for printing at the optimum printer resolution, and set the image size so that both dimensions on the image are equal to or greater than the corresponding print dimension.
2. Remember the resolution you’re using; you’ll need it in a later step.
3. Select the crop tool in Photoshop and at the top of the screen, enter the resolution (optimum printer resolution that you used to set the print image up) and the real height and width of the picture.
4. Select the crop you want. Photoshop will limit the dimensions of the crop area to match the aspect ratio for the print you’ve entered. You may have to cancel and re-crop a couple of times to get the result you want, particularly with respect to what parts of the original image you lose.
When you crop like this, Photoshop will enforce both dimensions and resolution as you set them, which means you’ll up-or down-sample without knowing it. It also requires trial and error to position the crop. Better way? Try this.
1. Prepare the image for printing at the optimum resolution, setting image dimensions so that the image is at least as large in any dimension as the print will be.
2. Press the “Q” key to enter Quick Mask mode.
3. Select the Rectangle tool, and move over on the tool bar to the pull-down associated with “Geometry Options”. In this, select “Fixed Size” and enter the size of the print you’ll want, being sure to enter the larger dimension number in the dimension corresponding to the larger dimension of the image. Click on the image just inside the upper left corner, and you’ll draw a pink rectangle.
4. Press “Q” again to exit quick mask mode. You’ll now see the classical selection dotted-box. What is OUTSIDE that box is currently selected.
5. Select “Select-Invert” to select what’s INSIDE the box.
6. Select “Select-Transform Selection” and move the selection to fit the area you want to print.
7. Click inside the new position to fix the selection.
8. Select “Image-Crop” and you’ll crop to match that selection.
9. Print.
Practice this procedure a couple of times before you commit!
The Last Word on Resolution
We’ve said this before, but we can’t say it enough. More is better. You can down-sample at good quality, but no matter what you do, up-sampling won’t be a high-quality process. The price of high resolution is big files, of course, and expensive cameras and scanners. If you’re not printing images, it may not be helpful to get super-resolution images; nothing on the web will display them. But even for web output, very high megapixel ratings or scanner dpi will let you crop to a small piece of an image and still retain good quality.
Tom’s photo-tips are Copyright © CIMI Corporation, and adapted from his posting on his website at http://www.cimicorp.com/DI/DINav.html. Used by permission.
|