 There are a lot of photographic topics that test anyone’s comprehension, and a few of these are unfortunately kind of fundamental to successful digital photography. One, and perhaps the most important one, is the concept of dynamic range.
In simple terms, dynamic range is the ratio of light value between the lightest and darkest parts of a scene. Real life presents an enormous dynamic range, and because the human eye adjusts to the brightness of the thing it’s looking at, human vision has a large dynamic range. Film and digital imaging processes have a much smaller dynamic range, and this “shrinking” of the range can create a bunch of really ugly shots. Most of the time, there’s little to be done about the dynamic range limitations of your chosen camera. Sometimes there’s more to be done than you think. That’s particularly true if you happen to have the Fuji S2 PRO. But first, let’s get to the problems of dynamic range.
When a scene has a big light-value difference between the bright and dark areas, almost every photographic device will end up either burning the light areas to featureless white, dumping the dark areas into featureless black, or a little of both. This problem is very likely to occur in winter photography, because snow creates a very light highlight area, and the angle of the sun can throw sections of the scene into a shadow that turns completely opaque. Nearly everyone who’s taken a picture in winter has a nice collection of silhouettes; dark shapes on snow that show no detail at all.
Since you can’t expand the dynamic range of your camera, the only way to address the problem (besides picking whether you want burnt-out highlights or opaque dark shadows) is to make several exposures of the same shot from a tripod and blend the pictures together. One exposure is correct for the highlights and will leave the shadow areas very dark, and the other will be exposed for the shadows and leave the highlights burned out.
What? Blend two images? There are three steps involved:
- Paste the two images into a common digital file as two different layers, with the lighter one (the one where you’ve exposed for the dark shadow areas) on the top.
- Adjust the image positions as necessary to get them perfectly aligned.
- Combine the images to take the light areas from the lower layer and the dark areas from the higher one.
Of course, these steps might not seem all that easy. The first one is pretty much mechanical, but numbers two and three could certainly be rather involved. Getting the two image layers in alignment is a delicate task, and it’s impossible if elements of the picture moved between the two exposures. Combining the two layers might also seem a bit complicated. Fortunately there are some tools that can help in the combining step, but first let’s look at how you might use this form of dynamic range expansion manually.
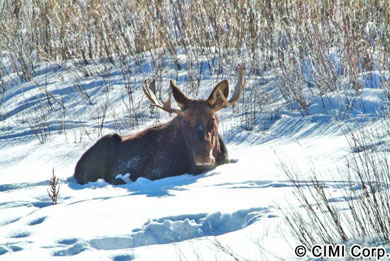
Suppose you have a picture of an animal like a moose, standing in snow. Take the shot under normal matrix metering conditions and you have moose silhouette. Spot meter on the moose and you’ve got a reasonably exposed moose in what will look like cotton batting. So spot meter on the moose for one shot, on the snow for the other (do it fast so the moose doesn’t move) or bracket the exposure by at least 2/3rds of a stop each way, and start to work.
The first step is to identify the image in which the background exposure is roughly correct. Ignoring the moose for the moment, do your color balancing and other adjustments to get the best image of the background that you can get. The moose will be a blob. Now, find the exposure in which the moose is best and ignore the rest of the scene to optimize your image of the moose. Generally, for both these images, you’ll want to be a tad underexposed to get good color saturation. Now, copy the background-scene image and paste it over the moose image as a layer. Set the opacity of this layer very low so you can just see the moose outline, and line up the moose with the layer below. You’ll have to zoom in to get this exact, and take your time doing it. When you’re done, restore the top layer to full opacity; you won’t see your lower moose exposure at all.
When you have the layers aligned, zoom in on the moose itself. Select the eraser tool of Photoshop, with a brush that has hard edges and that is relatively small compared to the image. Set the opacity of the eraser tool low, perhaps to 20%, and carefully start to remove the upper (dark) layer to reveal the properly exposed moose underneath. When you have the proper amount removed, you’ll have a good moose on a good background! Now just flatten the image, tweak the adjustments for the final exposure and color settings, sharpen, and you’re done.
This approach will work pretty well where you have a single area that’s much darker than the rest of the shot, like our moose. If you have a picture with a scattering of light and dark areas throughout, you’ll be erasing forever to get a clean image. For that situation, you have two options.
First, if you use Photoshop’s select by color range command (in the SELECT menu), and use the pull-down to select shadow areas. Feather the result and do your erase. This sometimes works really well, but you’ll have to select the feathering really carefully to avoid developing a halo around the dark areas. It’s sometimes helpful to fiddle with modify-expand, modify-contract, and feather to get the selection just right. Again, it can be a lot of work.
For those who (like me) are work-adverse, Fred Miranda has a Photoshop action (DRI, for Dynamic Range Increaser) to do the dog work of merging the images for you. I’ve found that DRI works best when there’s somewhere between a full stop and a stop-and-a-half of exposure difference between the two images, but you’ll have to experiment to get the values that work best for you.
Wondering where the S2 comes into this? Well, here it comes. With the Miranda tool, the image combining is really easy (I still use the layer-eraser approach for some shots where there’s only one shadowed area), the problem of getting the two images is still a biggie, and getting them aligned isn’t easy either—unless you have an S2.
The Fuji S2 CCD captures a larger dynamic range than the normal conversion to the RGB space would use. Standard Photoshop 8-bit RGB can be visualized as a color cube that’s 8 bits of luminosity value wide in each color dimension. The S2 captures a larger range than this, so what you get when you shoot a standard JPG image with the S2 is a little cube that’s extracted from the larger S2 image cube based on your exposure compensation, etc. But what’s interesting is that if you shoot in RAW format with the S2, and if you use Fuji’s RAW Converter EX, you can adjust not only normal settings like sharpness, white point, etc, but also sensitivity, which moves that RGB output cube around inside the larger captured color cube of the S2. In other words, you can do some exposure compensation at the time of conversion even if you didn’t bracket or shoot multiple exposures!
The EX converter provides -1 to +3 compensation at conversion time, though I think that this range is pushing things for at least some shots. There does appear to be at least a full stop of extra detail in each direction, atleast. That means that the highlights that burn white in standard exposure can be deciphered by underexposing a stop or so, and that shadows that fade to black (as they say in TV) can be boosted by overexposing at the conversion by that same one-or-more stops.
Let’s apply this feature to our hypothetical moose problem. We open the image of our moose and find the usual blob-in-the-snow silhouette. We select a sensitivity setting that seems to expose the snow roughly correctly (again, maybe a third-stop underexposed), and convert the RAW to TIFF at that setting to create “File-1”. We then add a stop or more to that setting (if we created the first image at zero compensation, we’d now create one at +1, for example) and convert again, producing “File-2”. These two files are absolutely identical pixel for pixel except exposure, so there’s no alignment issues to worry about. Paste dark-over-light in Photoshop and erase as above, or run Miranda’s DRI, and you’ve got a moose. The moose photo above was created using this technique.
It’s possible to carry this process to more than just two images/exposures. If you have extreme examples of highlights and shadows, you can create three or four versions of the image. Start with the two darkest and merge them, then merge the result with the next-lightest, and so forth. You’ll have to take care in this process to avoid creating halos or other artifacts, though.
Erik Krause provides a set of procedures and Photoshop actions on his website ( http://www.erik-krause.de/blending/ ) that he calls “contrast blending”. In his procedure, you create a stack of layers from darkest to lightest and then manipulate the opacity in each of the layers to get the best result in both highlights and shadows. Any number of layers could be used in theory, but his example shows a total of 8. This process clearly gives better control, but Erik’s layers work optimally if they are from one to two f-stops apart, so it will be more difficult to get all the exposure layers set up and properly aligned. Since the S2 EX converter will support from -2 to +3, it would support the contrast blending approach for up to about 6 layers (count them off on your fingers if you want to check my math). We haven’t tried this approach yet.
In theory, this approach may be applicable to other digital cameras where the vendor provides at-conversion-time exposure compensation. It may also be possible to apply some of these techniques to film or slide scanning, by varying the gamma setting. Since we don’t have other brands of digital camera, and don’t plan on scanning film or slides any more, don’t expect much help from us on those issues!
The beauty of this, above and beyond the elimination of taking multiple shots, is that you can fiddle with the compensation levels until you get the combination you like. Another benefit to digital images! We’ll offer more tips customized to our own digital camera selection, the S2, in the future.
Tom’s photo-tips are Copyright © CIMI Corporation, and adapted from his posting on his website at http://www.cimicorp.com/DI/DINav.html. Used by permission.